
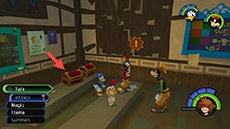
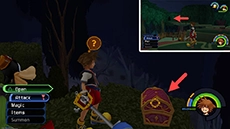
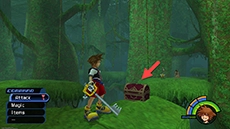
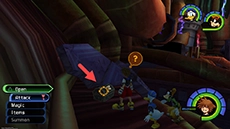
Treasure chests are scattered across the various worlds, filled with rare items and equipment. Sora can open these chests by approaching them and selecting the Open command.
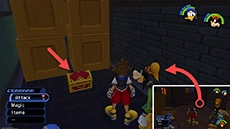
Treasure chests are often tucked away in hard-to-find or hard-to-reach places! Be sure to inspect each area thoroughly; you may have to return with a new ability later on in order to reach some chests.
| SELECT WORLD: |  |
 |
 |
 |
 |
 |
 |
 |
 |
 |
 |
 |
 |
Destiny Islands Treasures
| Reward | Area / Location | Screenshot |
|---|---|---|
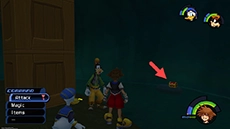
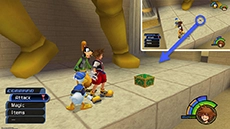
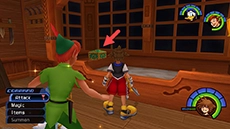
| Protect Chain | Cove In a cave near the zipline ladder; move the nearby box to reach it. |
 |
Traverse Town Treasures
| Reward | Area / Location | Screenshot |
|---|---|---|
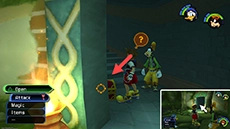
| Postcard | First District Unseal the Blue Trinity near the cafe; can be accessed later by using Glide. |
 |
| Postcard | First District Open the safe near the doors to the Second District. |
 |
| Postcard | First District On the roof of the Accessory Shop. |
 |
| Defense Up | First District Cast Blizzard on the candles to unlock the chest on the counter. |
 |
| Wishing Star | Geppetto's House In a green chest along the far wall. |
 |
| Postcard | Geppetto's House Examine the ceramic pot on the shelf in the far corner. |
 |
| Postcard | Item Shop Strike the ceiling fan by jumping from the stairs in Donald's nephews' shop. |
 |
| Mythril Shard | Accessory Shop Above a cabinet across from the fireplace. |
 |
| Postcard | Item Workshop Examine the flyer on the wall. |
 |
| Puppies (7-9) | Item Workshop In a chest on the far table. |
 |
| Mythril Shard | Item Workshop In a chest on the far table. |
 |
| Postcard | Second District On top of the store awning of Boots & Shoes; jump from the lightpost. |
 |
| Mega-Potion | Second District On a ledge in front of the Gizmo Shop. |
 |
| Mythril Shard | Second District On top of the roof with storefronts. |
 |
| Postcard x2 | Gizmo Shop Step on three pressure plates and examine the clock. Must first cast Thunder on exposed wiring in Third District. |
 |
| Pretty Stone | Red Room In a red chest along the front wall. |
 |
| Elixir | Green Room In a blue chest on the small circular table. |
 |
| Mythril | Green Room Strike the clock above the door to the Red Room nine times; the chest will appear on the dresser. |
 |
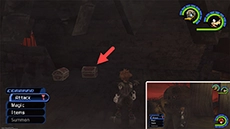
| Potion | Alleyway Behind a group of crates in the corner near the passage to the 2nd District. |
 |
| Pretty Stone | Alleyway On an awning at the edge of the hotel's balconies. |
 |
| Potion | Alleyway On the hotel balcony nearest to the waterway. |
 |
| Puppies (4-6) | Alleyway Behind large wooden crates; accessible by unsealing the Red Trinity in the First District. |
 |
| Orichalcum | Secret Waterway Unseal the White Trinity across from the mural. |
 |
| Puppies (10-12) | Secret Waterway Just inside the stairwell leading to Merlin's Study. |
 |
| Puppies (1-3) | Mystical House On a stone near the perimeter behind Merlin's House. Requires shared ability Glide. |
 |
| AP Up | Mystical House Unseal the Yellow Trinity in front of the boxes next to Merlin's House. |
 |
| Postcard | Third District Examine the corner of the balcony; accessible through the rooftop of the Second District. |
 |
Wonderland Treasures
| Reward | Area / Location | Screenshot |
|---|---|---|
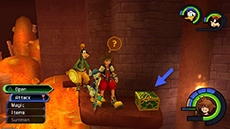
| Camping Set | Rabbit Hole Defeat three waves of Heartless near the save station; the chest will appear near the wall.1 |
 |
| Mega-Potion | Rabbit Hole Defeat three waves of Heartless near the save station; the chest will appear near the wall.2 |
 |
| Megalixir | Rabbit Hole Defeat three waves of Heartless near the save station; the chest will appear near the wall.3 |
 |
| Elixir | Rabbit Hole Unseal the Green Trinity in the center of the room. |
 |
| Mythril Shard | Bizarre Room (Upright) Unseal the Green Trinity inside the furnace. |
 |
| Defense Up | Bizarre Room (Sideways) Lighting the first torch reveals a chest from the lion head decoration. |
 |
| Puppies (13-15) | Queen's Castle On top of the tall hedge across from the save station. Accessible from Lotus Forest. |
 |
| Thundara-G | Queen's Castle On top of the tall hedge near the entrance to Lotus Forest. Accessible from upside-down Bizarre Room. |
 |
| Meteor-G | Queen's Castle On a ledge across from the entrance to Lotus Forest. Accessible from sideways Bizarre Room. |
 |
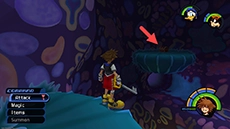
| Puppies (16-18) | Lotus Forest On a lillypad near the center of the area; jump on the nearby mushrooms to reach it. |
 |
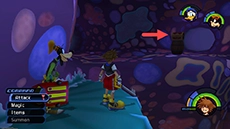
| Scan-G | Lotus Forest On a high lillypad in the corner near the passage to Tea Party Garden; accessible with near-pixel-perfect jump or shared ability High Jump. |
 |
| Thundara-G | Lotus Forest Cast Thunder on the pink flowers in the alcove; accessible by raising the lillypads (push the small rock near the passage to Queen's Castle while large). |
 |
| Orichalcum | Lotus Forest On a high lillypad, in the corner that's nearest the passage to Queen's Castle. Requires the shared ability Glide. |
 |
| Puppies (58-60) | Lotus Forest Cast Thunder on the pink flowers in the alcove accessible through the painting in sideways Bizarre Room. |
 |
| Lady Luck | Lotus Forest Unseal the White Trinity in the alcove accessible through the painting in sideways Bizarre Room. |
 |
| Dark Matter | Tea Party Garden On the cottage balcony; move the bear and clock in Bizarre Room to access. |
 |
| Flare-G | Tea Party Garden On top of a hedge in the corner nearest the cottage; accessible from the Lotus Forest passage that requires the shared ability Glide. |
 |
| Puppies (19-21) | Tea Party Garden On top of a hedge in the corner across from the cottage; accessible from the Lotus Forest passage that requires the shared ability Glide. |
 |
| Mythril | Tea Party Garden On top of a hedge in corner nearest the tea party table; accessible from the Lotus Forest passage that requires the shared ability Glide. |
 |
1 Must acquire chest before providing evidence to the Queen of Hearts.
2 Must acquire chest after providing evidence to the Queen of Hearts but before sealing the Keyhole in Hollow Bastion.
3 Accessible after sealing the Keyhole in Hollow Bastion.
Olympus Coliseum Treasures
| Reward | Area / Location | Screenshot |
|---|---|---|
| Mythril Shard | Gates Unseal the Blue Trinity in front of the statue on the left of the passage leading to the Vestibule. |
 |
| Puppies (22-24) | Gates Unseal the Blue Trinity in front of the statue on the right of the passage leading to the Vestibule. |
 |
| Mega-Potion | Gates Behind the pillars to the left of the Vestibule doors. |
 |
| Orichalcum | Gates Examine the purple vase behind the pillars to the right of the Vestibule doors; accessible after defeating Hades in the Hades Cup. |
 |
| Violetta | Gates Unseal the White Trinity in the center of the area. |
 |
| Holy-G | Gates Cast Blizzara on all braziers; a chest will appear along the perimeter wall (to your left when facing the Vestibule doors). |
 |
| Shiva Belt | Gates Cast Blizzaga on all braziers; a chest will appear along the perimeter wall (to your right when facing the Vestibule doors). |
 |
| Olympia | Vestibule Complete the Phil Cup, Pegasus Cup, and Hercules Cup. |
 |
Deep Jungle Treasures
| Reward | Area / Location | Screenshot |
|---|---|---|
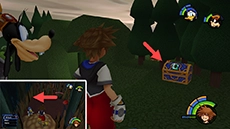
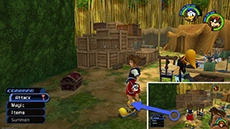
| Protect Chain | Tree House On the roof of the treehouse; accessible using ladder on a ledge along the outer wall of the tree house. |
 |
| Mega-Potion | Tree House On a ledge made of netting, under the treehouse. |
 |
| Mythril | Tree House In the rowboat suspended in front of the tree house; accessible with Glide or jumping from the roof and attacking. |
 |
| Mega-Ether | Tunnel On a ledge near the entrance to Treetops. |
 |
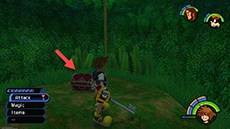
| Puppies (34-36) | Camp Unseal the Blue Trinity near the lab table. |
 |
| Mythril Shard | Tent On the ground in front of the projector. |
 |
| Thundara-G | Climbing Trees Unseal the Blue Trinity in front of the entrance to the Tree House. |
 |
| Mega-Potion | Hippo's Lagoon On a ledge along the wall across from the hippos. |
 |
| Meteor-G | Hippo's Lagoon On ledge along the wall nearest the hippos, accessible with High Jump or by jumping and swinging. |
 |
| Puppies (25-27) | Hippo's Lagoon On the far side of the lagoon, accessible by jumping on the hippos. |
 |
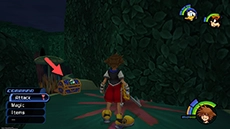
| Puppies (28-30) | Vines On a ledge in the center of the area; accessible by using the vines on the right as you enter the area. |
 |
| Mythril | Vines 2 On a ledge in the center of the area; accessible using the vines. |
 |
| Mega-Potion | Cliff On a high ledge across from the passage to Bamboo Thicket; accessible by climbing the nearby pole. |
 |
| Mythril Shard | Cliff On a high ledge across from the passage to Bamboo Thicket; accessible by climbing the nearby pole. |
 |
| Mythril Shard | Waterfall Cavern On the lowest ledge on the far side of the area. |
 |
| Puppies (31-33) | Waterfall Cavern On a ledge halfway up the falls; just under a wall covered in vines. |
 |
| Mythril | Waterfall Cavern On the highest ledge on the far side of the area. |
 |
| Orichalcum | Waterfall Cavern On a ledge near a climbable vine wall. |
 |
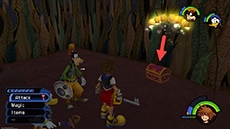
| Orichalcum | Cavern of Hearts Unseal the White Trinity in the center of the area. |
 |
Agrabah Treasures
| Reward | Area / Location | Screenshot |
|---|---|---|
| Mega-Potion | Plaza At ground level in a corner near the Storage Room. |
 |
| Mega-Ether | Plaza In the corner of a raised platform adjoined to a stall with a brownish-orange canopy. |
 |
| Cottage | Plaza On a high ledge in the corner, nearest the passage to the Desert; accessible from a passage through Aladdin's House. |
 |
| Mega-Potion | Storage Room Along the wall behind a group of wooden crates. |
 |
| AP Up | Storage Room Unseal the Green Trinity near the wall with shelving. |
 |
| Mega-Ether | Main Street On a ledge near the entrance to the Bazaar. |
 |
| Dark Matter | Main Street On a high ledge in the corner, above the upper passage leading to Alley; accessible from the high passage in Plaza. |
 |
| Mythril | Main Street On a high ledge to the right of the upper entrance to Palace Gates; requires High Jump. |
 |
| Mega-Potion | Alley On a ledge in the corner across from the entrance to the Plaza. |
 |
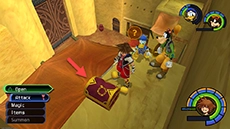
| Megalixir | Aladdin's House In the corner nearest the save station. |
 |
| Scissors-G ⯈ | Aladdin's House In the center of the room, on a step. |
 |
| Thundara-G | Bazaar On a ledge on the far side of the area, accessible by jumping across the wooden awnings. |
 |
| Fire Ring | Bazaar On the highest ledge in the corner across from the passage to Main Street; accessible by jumping across the wooden awnings and climbing up the wooden boxes. |
 |
| Protera Chain | Palace Gates On a ledge above the storefront along the wall, accessible by jumping from the upper entrance leading from Main Street. |
 |
| Puppies (52-54) | Palace Gates On the highest ledge in the corner across from the palace gates; requires shared ability High Jump. |
 |
| Osmose-G ⯈ | Palace Gates On the highest ledge in the corner nearest to the palace gates; requires shared ability Glide. |
 |
| Mega-Ether | Cave of Wonders: Entrance On a raised platform along the inner wall, near the passage to the Hall. |
 |
| Puppies (49-51) | Cave of Wonders: Entrance On top of a pillar near the entrance to the Hall, accessible using High Jump, Glide, or a well-positioned jump from a barrel. |
 |
| Ifrit Belt | Cave of Wonders: Entrance Unseal the White Trinity near the entrance. |
 |
| Elixir | Cave of Wonders: Hall On top of the platform with the water-spewing statues. |
 |
| Mythril Shard | Cave of Wonders: Hall In an alcove in the corner near the passage to Bottomless Hall. |
 |
| Elixir | Cave of Wonders: Bottomless Hall On a small platform near the entrance to the Hall, accessible with High Jump or a well-positioned jump while attacking. |
 |
| Cottage | Cave of Wonders: Bottomless Hall On top of the platform with the water-spewing statues, across from the passage to the Treasure Room. |
 |
| Mega-Potion | Cave of Wonders: Bottomless Hall On a far ledge across the chasm, accessible from alternate route in the Hall. |
 |
| Thundara-G | Cave of Wonders: Silent Chamber Unseal the Blue Trinity in the center of the area. |
 |
| Cottage | Cave of Wonders: Dark Chamber On a small platform in the corner; jump from the save point to reach it. |
 |
| Meteor-G | Cave of Wonders: Dark Chamber On a small platform along the wall, accessible from Relic Chamber passage opened by Abu.4 |
 |
| Protera Chain | Cave of Wonders: Dark Chamber On a raised platform accessible from the Relic Chamber passage opened by Abu; climb the waterfall and use Abu to lower it.4 |
 |
| Torn Page | Cave of Wonders: Dark Chamber On a platform in the center of the area; accessible by swimming up a waterfall in the Relic Chamber. |
 |
| Mythril | Cave of Wonders: Relic Chamber On a small platform in the corner; push the block in the Bottomless Hall to reach it. |
 |
| Thunder Ring | Cave of Wonders: Relic Chamber On a small platform in the corner, accessible by swimming and climbing the stairs. |
 |
| Puppies (46-48) | Cave of Wonders: Hidden Room Activate the statue to open the nearby wall; requires Yellow Trinity or High Jump. |
 |
| Haste2-G | Cave of Wonders: Hidden Room Activate the statue to open the nearby wall; requires Yellow Trinity or High Jump. |
 |
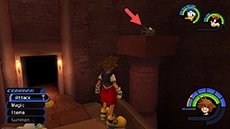
| Defense Up | Cave of Wonders: Treasure Room Above the fireplace along the perimeter. |
 |
| Mythril Shard | Cave of Wonders: Treasure Room On top of a pile of treasure; jump from above the fireplace to reach it. |
 |
| Puppies (37-39) | Cave of Wonders: Treasure Room On a ledge near the entrance to Bottomless Hall, accessible by jumping from on top of a pile of treasure. |
 |
| Thundaga-G | Cave of Wonders: Treasure Room On top of a pile of treasure along the perimeter; use Abu to activate the gemstone.4 |
 |
4 Aladdin must be in the party in order to summon Abu to touch the statues.
Monstro Treasures
| Reward | Area / Location | Screenshot |
|---|---|---|
| High Jump | Mouth Near Geppetto on the ship, accessible after defeating Parasite Cage. |
 |
| Scan-G | Mouth On a wooden platform across from the ship, accessible with High Jump. |
 |
| Mythril Shard | Mouth Unseal the Green Trinity on top of the ship. |
 |
| Watergleam | Mouth On the highest platform nearest Monstro's teeth, accessible with High Jump. |
 |
| Cottage | Mouth On the highest platform along the wall adjoining the shipwreck, accessible with High Jump. |
 |
| Puppies (73-75) | Mouth On a high platform along the wall, across from the shipwreck; accessible with High Jump. |
 |
| Cottage | Chamber 2 At ground level, near the entrance to Chamber 3. |
 |
| Megalixir | Chamber 2 On a small platform with barrels, accessible from the higher level of Chamber 3. |
 |
| Mega-Ether | Chamber 3 At ground level, near a passage blocked by wooden planks. |
 |
| Osmose-G ⯇ | Chamber 3 On the upper level, under a green platform. |
 |
| Flare-G | Chamber 3 On a bluish-green platform, just above the previous chest. |
 |
| Puppies (55-57) | Chamber 3 On a bluish-green platform, just above the entrance to Chamber 2. |
 |
| Thundaga-G | Chamber 5 At ground level, across from the entrance to Chamber 6. |
 |
| Mega-Ether | Chamber 5 At ground level, across from the entrance to Chamber 6. |
 |
| Mythril | Chamber 5 On a bluish-green platform, across from the entrance to Chamber 4. |
 |
| Puppies (79-81) | Chamber 5 On a high ledge on top of a barrel, across from the entrance to Chamber 4. |
 |
| Puppies (76-78) | Chamber 6 At ground level, across from the passage to Chamber 5. |
 |
| Torn Page | Chamber 6 On a high bluish-green platform, across from the entrance to Chamber 5. |
 |
| Megalixir | Chamber 6 On a high bluish-green platform, across from the previous chest. |
 |
| Mythril | Chamber 6 On a high ledge, across from an alternate entrance to Chamber 1. |
 |
| Dark Matter | Chamber 6 Unseal the White Trinity across from the entrance to Chamber 3. |
 |
Atlantica Treasures
| Reward | Area / Location | Screenshot |
|---|---|---|
| Mythril Shard | Undersea Valley Cast Fire on the red clam on a platform near the passage to Tranquil Grotto. |
 |
| Mega-Ether | Undersea Valley Strike the clam in the small cave along the wall. |
 |
| Mega-Potion | Undersea Valley Strike the clam on the platform near the ocean floor, below the red clam. |
 |
| Mythril | Undersea Valley Strike the clam in the covered alcove along the wall, near the previous clam. |
 |
| Elixir | Undersea Valley Strike the clam on the pillar near the large vertical jetstream. |
 |
| Cottage | Undersea Valley Strike the clam on the platform along the far wall. |
 |
| Cottage | Undersea Cave Strike the clam in the small alcove in the wall, about halfway up. |
 |
| Mythril Shard | Undersea Gorge Cast Blizzard on the blue clam in the low corner, near the passage to Undersea Cave. |
 |
| Mega-Ether | Undersea Gorge Strike the clam on a platform in the center of the area. |
 |
| Orichalcum | Undersea Gorge In a large wooden chest near Ariel's Grotto; accessible using a jetstream in the Sunken Ship. |
 |
| Mega-Potion | Undersea Garden Strike the clam along the far wall. |
 |
| Mega-Potion | Ariel's Grotto In a chest at the ground level, near the grandfather clock. |
 |
| Cottage | Ariel's Grotto In a chest on a shelf about halfway up, just under several volumes of books. |
 |
| Torn Page | Ariel's Grotto In a chest on a shelf about halfway up, with some vases and a picture frame. |
 |
| Mega-Ether | Triton's Palace Strike the clam on the ocean floor in the corner, near three pillars. |
 |
| Cottage | Triton's Palace Strike the clam on the ocean floor, below the passage to the Undersea Gorge. |
 |
| Elixir | Triton's Palace Strike the clam on the ocean floor, between the large shell structure and the entrance to the Throne Room. |
 |
| Mythril Shard | Triton's Palace Cast Thunder on the yellow clam on a pillar, near the passage to the Throne Room. |
 |
| Orichalcum | Triton's Palace Unseal the White Trinity in the center of the large shell structure. |
 |
| Mythril Shard | Sunken Ship In a chest on the ocean floor, behind the wreckage of a smaller ship. |
 |
| Elixir | Sunken Ship In a chest on the ocean floor, inside the wreckage of a turned over ship. |
 |
| Crystal Trident | Sunken Ship: Below Deck In a chest towards the back of the ship, near the broken window. |
 |
| Mythril Shard | Sunken Ship: Below Deck In a chest in the corner, across from the large broken window and near the stairs. |
 |
| Mythril | Sunken Ship: Below Deck Strike the clam on the ocean floor, in a hole below the stairs. |
 |
| Mega-Ether | Cavern Nook Strike the smaller clam, near the large clam with the save station. |
 |
| Mythril | Ursula's Lair Case Fire twice on the purple urchin near the clam in the wall to reveal a chest. |
 |
Halloween Town Treasures
| Reward | Area / Location | Screenshot |
|---|---|---|
| Power Up | Guillotine Square On a ledge inside a pumpkin structure, accessible with High Jump. |
 |
| Elixir | Guillotine Square Ring the spider doorbell on the house three times. |
 |
| Thundara-G | Guillotine Square Under the stairs leading to the house. |
 |
| Puppies (70-72) | Guillotine Square Inside the mouth of a pumpkin-like structure, accessible with Glide. |
 |
| Elixir | Guillotine Square Inside the mouth of a pumpkin-like structure, accessible with Glide. |
 |
| Torn Page | Research Lab Examine the bookcase across from the Doctor. |
 |
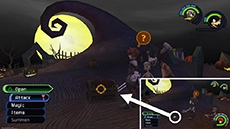
| Jack-in-the-Box | Graveyard Inside the exploded pumpkin, after clearing the Mayor's challenge. |
 |
| Puppies (67-69) | Moonlight Hill Unseal the White Trinity in front of the hill. |
 |
| Meteor-G | Bridge On a small ledge above the sewer entrance to Guillotine Square. |
 |
| Flare-G | Bridge On a small platform under the bridge. |
 |
| Defense Up | Bridge On a small ledge in the far corner of the area. |
 |
| Mythril Shard | Oogie's Manor 5 Unseal the Red Trinity near the archway at ground level. |
 |
| Ether | Oogie's Manor 5 Just outside the front door of the manor. |
 |
| Orichalcum | Oogie's Manor 5 In a cage across from the front door to the manor. |
 |
| Ether | Oogie's Manor 5 Just inside the front door of the manor. |
 |
| Mega-Ether | Oogie's Manor 5 In a higher cage about halfway up the manor; more easily accessible after activating the switch in the Evil Playroom. |
 |
| Puppies (40-42) | Oogie's Manor 5 In an alcove halfway up the manor; must activate the switch in the Evil Playroom first. |
 |
| Scissors-G ⯇ | Cemetery To the right of a mausoleum with stairs and a + on the front. |
 |
| Holy-G | Cemetery To the left of a spider-like tombstone. |
 |
| Puppies (64-66) | Cemetery In the far corner, near a tombstone with "RIP" on it. |
 |
| Dark Matter | Cemetery In the far corner, behind a tree with a hanging skeleton. |
 |
5 If this chest is not acquired prior to defeating Oogie's Manor, they will appear in a hole in the center of Manor Ruins thereafer. See screenshots for reference.
Neverland Treasures
| Reward | Area / Location | Screenshot |
|---|---|---|
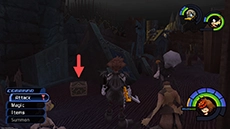
| Paper-G ⯈ | Ship: Hold On the upper rafters along the port side of the ship, requires Glide. |
 |
| Puppies (82-84) | Ship: Hold On the upper rafters along the starboard side of the ship, requires Glide. |
 |
| Dark Matter | Ship: Hold Unseal the Yellow Trinity in the Hold, in the chest farthest from the door. |
 |
| Orichalcum | Ship: Hold Unseal the Yellow Trinity in the Hold, in the blue chest nearest the door. |
 |
| Puppies (85-87) | Ship: Hold Unseal the Yellow Trinity in the Hold, in the green chest on rolls of canvas. |
 |
| Aero(ra/ga) | Ship: Hold Unseal the Yellow Trinity in the Hold, in the red chest on the highest shelf. |
 |
| Meteor-G | Ship: Galley In the corner nearest the stove. |
 |
| Protera Chain | Ship: Cabin Along the wall near the save station. |
 |
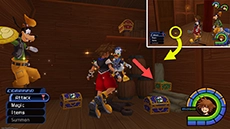
| Puppies (88-90) | Captain's Cabin Next to the bed, near the side window. |
 |
| Orichalcum | Pirate Ship In the crow's nest nearest the front of the ship. |
 |
| Puppies (43-45) | Pirate Ship Unseal the White Trinity near the ship's wheel. |
 |
| Flare-G | Clock Tower In the corner of the balcony. |
 |
Hollow Bastion Treasures
| Reward | Area / Location | Screenshot |
|---|---|---|
| Life-G | Rising Falls At the lowest level, behind a set of stalagmites. |
 |
| Puppies (91-93) | Rising Falls On a floating platform about a quarter of the way up the falls. |
 |
| Blizzara Ring | Rising Falls On a floating platform about halfway up the falls. |
 |
| Meteor-G | Rising Falls Enter the third-highest bubble to reach the chest under the ice. |
 |
| Megalixir | Rising Falls On a floating platform about three quarters of the way up the falls. |
 |
| Thundaga-G | Rising Falls Unseal the White Trinity near the archway about halfway up the falls. |
 |
| Defense Up | Rising Falls Enter the fourth bubble about halfway up the falls; accessible after completing first story episode. |
 |
| Mythril | Base Level On a small platform behind the movable block, accessible through the higher bubble. |
 |
| Thundara-G | Base Level On a platform near a blue crystal, accessible using the movable block. |
 |
| Paper-G ⯇ | Base Level On a platform near the node leading to Castle Gates, accessible using Glide. |
 |
| Thundaga-G | Waterway Accessible via unsealed passage at Base Level, use Beast's Call command. |
 |
| Fira Ring | Waterway Just behind the save station; area is accessible using the lower bubble at Base Level. |
 |
| Dark Matter | Waterway Cast Blizzard on the bubble in the hallway, then use it to jump to the high ledge. |
 |
| Thundaga-G | Dungeon In the back-right corner. Room is accessible from Waterway using Beast's Call command. |
 |
| Ultima-G | Dungeon In the back-right corner. Room is accessible from Waterway using Beast's Call command. |
 |
| AP Up | Entrance Hall Climb the pillar to the right of the Heartless sigil door, then jump across to the left pillar. |
 |
| Mega-Potion | Library Rotate the pillar on the second floor, near the exposed red button. |
 |
| AP Up | Library Rotate the upper part of the pillar from above the bookcase across from the second floor balcony. |
 |
| Elixir | Library Rotate the lower part of the pillar near the bookcase across from the second floor balcony. |
 |
| Mythril | Library Rotate the pillar between two bookcases on the second floor. |
 |
| Ultima-G | Library On top of a bookcase, nearest the ground floor passage to the Entrance Hall. |
 |
| Puppies (97-99) | Lift Stop Cast Gravity on the small floating platform above; area accessible from passage in Library. |
 |
| Osmose-G ⯈ | Lift Stop Cast Gravity on the small floating platform above; area accessible by activating node the Lift Stop passage from the Library. |
 |
| Mythril | Lift Stop Examine the node in the corner; this area accessible from passage through the Waterway. |
 |
| Orichalcum | Lift Stop Cast Gravity on the small floating platform above; area accessible using node in Lift Stop after Heartless sigil door. |
 |
| Royal Crown | Lift Stop Cast Gravity on the small floating platform above; accessible from the passage behind the blocks with the Heartless sigil at High Tower. |
 |
| Ramuh Belt | Lift Stop Cast Gravity on the small floating platform above; area accessible by activating the switching node at High Tower, then activating the node at the Lift Stop passage from the Library. |
 |
| Puppies (94-96) | Castle Gates Cast Gravity on the small floating platform above; located in the far corner accessible using Glide. |
 |
| Orichalcum | Castle Gates On a lone pillar in front of the castle; accessible by activating the moving platforms and using Glide. |
 |
| Haste2-G | Castle Gates On a high ledge near the metal gates; accessible by activating the moving platforms and using Glide. |
 |
| Thundaga-G | Great Crest Along the castle's wall, accessible after riding the large circular platform across the front of the castle. |
 |
| Orichalcum | Great Crest In a corner near some rubble, on your immediate left after passing through the Lift Stop. |
 |
| Thundara Ring | High Tower Cast Gravity on the small floating platform above, on the right side of the area near the entrance to the Lift Stop. |
 |
| Osmose-G ⯇ | High Tower Cast Gravity on the small floating platform above, on the left side of the area accessible through the Lift Stop. |
 |
| Megalixir | High Tower On a high ledge, accessible by activating the nodes that move the blocks with the Heartless sigil. |
 |
| Oblivion | Grand Hall On a high ledge, across from the portal to the Dark Depths; accessible during second story episode. |
 |
| Puppies (61-63) | Grand Hall On ledge to the left of the portal leading to the Dark Depths. |
 |
| Dark Matter | Grand Hall Along the right wall, near the stairs. |
 |
End Of The World Treasures
| Reward | Area / Location | Screenshot |
|---|---|---|
| Mythril Shard | Final Dimension The first green chest along the invisible path. |
 |
| Pretty Stone | Final Dimension The second green chest along the invisible path; chest will spawn Heartless. |
 |
| Mega-Potion | Final Dimension The third green chest along the invisible path. |
 |
| Mythril | Final Dimension The red chest near the midpoint of the invisible path; chest will spawn Destroyed Behemoth. |
 |
| Elixir | Final Dimension The fourth green chest, just past the midpoint of the invisible path. |
 |
| Mythril Shard | Final Dimension The fifth green chest, past the midpoint of the invisible path. |
 |
| Pretty Stone | Final Dimension The sixth green chest, past the midpoint of the invisible path; chest will spawn Heartless. |
 |
| Cottage | Final Dimension The second red chest, near the end of the invisible path. |
 |
| AP Up | Final Dimension The seventh green chest, near the end of the invisible path on the far left. |
 |
| Gale | Final Dimension The eighth and final green chest, at the end of the invisible path; chest will spawn Heartless. |
 |
| Dark Matter | Giant Crevasse Near the top of the area with some stalagmites. |
 |
| Meteor Strike | Giant Crevasse On a high small ledge under a room covered in purple webbing; Heartless will spawn in here. |
 |
| Drill-G | Giant Crevasse On a ledge near the middle of the area. |
 |
| Ultima-G | Giant Crevasse On a ledge near the middle of the area, connected by two narrow ledges. |
 |
| Full-Life-G | Giant Crevasse On a small ledge under a room covered in purple webbing; Heartless will spawn in here. |
 |
| Spirit Gem | World Terminus: Traverse Town In the corner to the right of the fountain. |
 |
| Thunder Gem | World Terminus: Wonderland Along the wall under some hanging pictures. |
 |
| Frost Gem | World Terminus: Olympus Coliseum In the corner, behind the foot of the statue (to the right when facing the Vestibule doors). |
 |
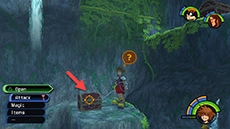
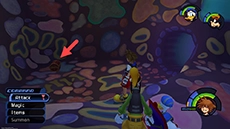
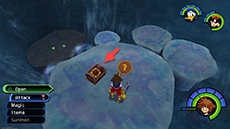
| Bright Gem | World Terminus: Deep Jungle On the mossy rock near the center of the area. |
 |
| Blaze Gem | World Terminus: Agrabah On the highest platform in the corner across from the Palace Gates. |
 |
| AP Up | World Terminus: Atlantica On the ocean floor, near the caved in passage on the far wall. |
 |
| Lucid Gem | World Terminus: Halloween Town On the highest platform with the orange-colored button. |
 |
| Mighty Shield | World Terminus: Neverland In the corner of the Galley, near the stove. |
 |
| Megalixir | World Terminus: Hundred Acre Wood Just near the save station. |
 |
| Elixir | World Terminus: Hollow Bastion On the floor inside the inner chamber with the control panel. |
 |
| Megalixir | Final Rest Along the wall near the save station. |
 |
Hundred Acre Wood Treasures
| Reward | Area / Location | Screenshot |
|---|---|---|
| Mythril Shard | Meadow In the end of the hollowed out log in the center of the area. |
 |
| Mega-Ether | Pooh's House Strike the chimney on the roof; the item will fall onto the floor inside. |
 |
| Elixir | Pooh's House Open the cabinet in the corner. |
 |
| AP Up | Bouncing Spot Inside the stump in the center of the area. |
 |
| Mythril | Bouncing Spot Strike the darkened part of the log near the back of the area. |
 |
| Dark Matter | Bouncing Spot In a small alcove behind Tigger & Roo's see-saw. |
 |
| Mythril Shard | Bouncing Spot On a high ledge in the corner; have Tigger launch you from the see-saw. |
 |
| Shield2-G | Bouncing Spot Jump into the hole in the top of the tree nearest Pooh; have Tigger launch you from the see-saw. |
 |